

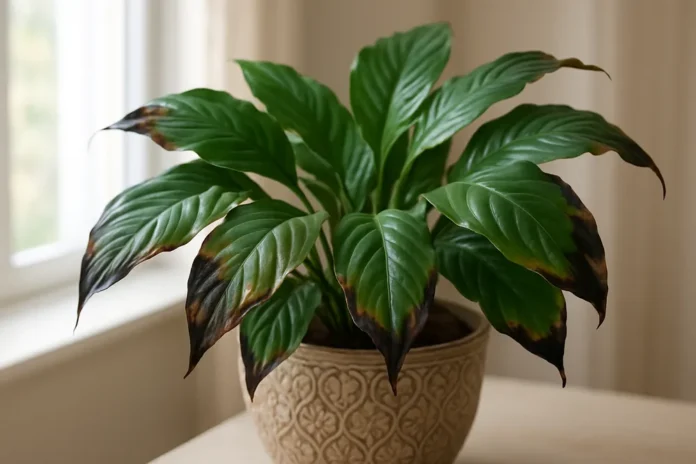
Peace lily leaves develop black edges most often from watering stress, dry air, fertilizer salt buildup, or temperature damage. In some cases, black margins also show up when roots stay too wet and begin to decline.
If your peace lily is developing dark, crispy margins, the problem is usually stress rather than a mysterious disease. Leaves with black edges often signal that the plant is reacting to inconsistent moisture, dry indoor air, mineral-heavy water, excess fertilizer, or sudden temperature swings.
Peace lilies are popular because they are forgiving, but they still have limits. When conditions drift too far from what they like, the leaf edges tend to show damage first. The good news is that blackening along the margins is often fixable once you match the symptom pattern to the cause.
What Black Edges Usually Mean on a Peace Lily
Black edges are a form of leaf tissue death. The plant cannot turn those damaged areas green again, so the goal is to stop the spread and protect new growth. On peace lilies, the pattern matters. Crispy black or dark brown margins usually point to dryness, salt injury, or heat and cold stress. Softer, darker edges that spread into yellowing can point to overwatering or root trouble.
Because several issues can look similar at first, it helps to think about recent care. A plant that was allowed to wilt hard between waterings tells a different story than one sitting in soggy soil. A plant near an air vent or cold window may show edge damage even when watering is otherwise fine.
- Crispy black edges often suggest dry air, underwatering, or salt buildup.
- Soft blackening with yellow leaves often suggests root stress from excess moisture.
- Damage concentrated on one side often suggests sun, cold, or a nearby heat source.
- Older leaves affected first often points to accumulated stress like salts or inconsistent watering.
Watering Problems Are the Most Common Cause
Underwatering and Repeated Wilting
Peace lilies like evenly moist soil, not bone-dry cycles. If the potting mix gets too dry, the leaf edges can dehydrate and turn brown-black, especially after repeated wilting. Even if the plant perks up after watering, the damaged margins remain.
This kind of damage often appears dry and papery. You may also notice drooping leaves, a very light pot, and soil that pulls away from the sides of the pot. If drying out happens often, new leaves may emerge smaller and older leaves may decline faster.
Overwatering and Suffocating Roots
Too much water can cause black edges too, but the look is usually a little different. Roots need oxygen as much as moisture. When the pot stays wet for too long, roots weaken and struggle to support the leaves. The result can be soft dark margins, yellowing, drooping despite wet soil, and a stale smell from the potting mix.
Home gardeners sometimes assume a droopy peace lily always needs more water. That is risky. A thirsty peace lily and an overwatered peace lily can both wilt. The easiest clue is the soil. If the top inch is still wet and the plant looks limp, too much water may be the real problem.
- Underwatering damage is usually crisp, dry, and brittle.
- Overwatering damage is often soft, dark, and paired with yellowing.
- Inconsistent watering can create a mix of both symptoms on the same plant.
Low Humidity Can Scorch the Leaf Margins
Peace lilies are tropical plants, so dry indoor air can stress them, especially in winter. When humidity drops, leaves lose moisture faster than the roots can replace it. The tips and edges dry out first because they are the most exposed parts of the leaf.
Humidity-related edge burn is common in homes with forced-air heat, fireplaces, or air conditioning running for long periods. It can show up even when your watering routine is decent. The leaves may look otherwise healthy, but the borders become thin, dark, and crispy.
- Dry air damage is more likely during winter heating season.
- Plants near vents, radiators, or frequently opened exterior doors are at higher risk.
- New growth may look better once humidity improves, even though old leaves stay marked.
Tap Water and Fertilizer Salts Often Build Up in the Soil
Peace lilies are sensitive to dissolved minerals and salts. If you use softened water, hard tap water, or fertilizer too often, salts can collect in the potting mix. Over time, those salts pull moisture away from root tissues and burn leaf edges.
This issue is especially common when a plant has been in the same pot for a long time or when fertilizer is applied on a strict schedule even in low light. White crust on the soil surface or around the pot rim is a strong clue. So is edge burn appearing shortly after feeding.
Water Quality Matters More than Many Gardeners Expect
Some peace lilies react to chlorine, fluoride, or heavy mineral content in municipal water. The sensitivity is not identical in every home, but if your plant gets black or brown edges despite otherwise good care, water quality deserves a close look. Distilled, filtered, or rainwater often reduces recurring edge damage in sensitive plants.
- Fertilizer burn often starts at the tips and margins.
- Hard or softened water can worsen salt stress over time.
- A plant growing slowly needs less fertilizer than the label may suggest.
Temperature Stress Can Darken Leaf Edges Fast
Peace lilies prefer stable indoor temperatures. Cold drafts, chilly window glass, hot afternoon sun through glass, or blasts from heating vents can all damage the leaf margins. In these cases, the blackening may appear suddenly rather than gradually.
Cold injury is especially common when leaves touch a winter window or when the plant is left in a car during cool weather. Heat stress is more likely if the plant sits near a heater or receives direct sun that scorches the leaf surface. Either way, the damaged tissue turns dark and does not recover.
- Keep peace lilies away from AC vents and heater vents.
- Do not let foliage press against cold glass.
- Bright, indirect light is safer than direct midday sun.
Root Crowding and Old Potting Mix Can Make the Problem Worse
A slightly root-bound peace lily can do fine, but severe crowding creates stress. When roots fill the pot, water may run through too quickly or the soil may become hard and unevenly wet. That can lead to repeated drought stress at the edges of the root ball, which later shows up as blackened leaf margins.
Old potting mix also breaks down over time. As it compacts, it can hold too much water while also reducing airflow around the roots. That combination makes it harder to water correctly and easier for salts to accumulate.
Signs the Pot and Soil Are Part of the Issue
- Roots circling densely around the inside of the pot
- Water rushing straight through without soaking evenly
- Soil that stays soggy for many days or has a sour smell
- A plant that dries out much faster than it used to
- White mineral crust or fertilizer residue on the soil surface
Pests and Disease Are Possible, but Less Common
Most black-edged peace lily leaves come from environmental stress, not infection. Still, pests and disease can contribute, especially when the plant is already weakened. Root rot from chronically wet soil can cause darkening along the edges because failing roots cannot support healthy foliage.
Sap-sucking pests like spider mites can also stress leaves and create a dull, damaged look, though they more often cause stippling, yellowing, or fine webbing than true black margins. Leaf spot diseases usually create distinct spots rather than a clean dark outline along the edge.
- Check for mushy roots and a foul smell if overwatering is suspected.
- Inspect the undersides of leaves for mites, scale, or mealybugs.
- Isolated black spots are more suggestive of leaf spot than uniform edge burn.
How to Tell Which Cause Is Most Likely
You can usually narrow the cause by pairing the leaf pattern with your recent care routine and the plant's location. Think in terms of clues instead of looking for a perfect match. Peace lilies often show combined stress, especially if dry air and watering inconsistency happen at the same time.
- If the edges are crisp and the soil often dries hard, underwatering or low humidity is likely.
- If the edges are soft or spreading and the soil stays wet, overwatering or root decline is more likely.
- If damage worsened after feeding, fertilizer burn or mineral buildup is a strong possibility.
- If only the side facing a window or vent is affected, temperature or light stress is likely.
- If the plant has been in the same soil for years, compacted mix and salt accumulation may be contributing.
How to Stop Black Edges From Getting Worse
Adjust Watering First
Water when the top inch of soil feels dry to the touch, not on a rigid calendar. Soak the pot thoroughly until excess drains out, then empty the saucer so roots do not sit in water. If the soil has become extremely dry and is repelling water, rehydrate it slowly until the root ball is evenly moist.
Improve Humidity and Placement
Move the plant away from heating vents, AC drafts, and cold windows. Grouping plants together, using a room humidifier, or placing the plant in a naturally more humid room can help prevent further edge scorch. Avoid direct hot sun, especially in the afternoon.
Reduce Salt Stress
If you suspect mineral or fertilizer buildup, flush the pot thoroughly with clean water to rinse out excess salts. Pause fertilizer until the plant is actively growing again. When you resume feeding, use a diluted houseplant fertilizer and apply it less often than the package maximum.
Refresh the Potting Mix if Needed
Repot if the plant is badly root-bound, the soil is compacted, or root rot is present. Use a loose, well-draining indoor potting mix in a container with drainage holes. Trim away mushy roots before replanting if rot is found.
Trim Damaged Tissue for Appearance
You can trim off black edges with clean scissors by following the natural outline of the leaf. Leave a very thin line of dark tissue rather than cutting into healthy green tissue. Remove entire leaves only if they are mostly damaged or yellowing heavily.
What Healthy Recovery Looks Like
Recovery shows up in new growth, not in the damaged edges. Once conditions improve, fresh leaves should emerge greener, smoother, and free of expanding black margins. Older leaves may still look rough, but the key sign is that the problem stops spreading.
Peace lilies usually respond within a few weeks to better watering and placement, though a severely stressed or root-damaged plant can take longer. Be patient and avoid piling on multiple products. Simple corrections usually work better than aggressive treatment.
FAQ
Should I Cut Off Peace Lily Leaves with Black Edges?
Yes, if the damage bothers you or the leaf is mostly affected. Trim only the blackened portion with clean scissors, or remove the whole leaf if it is largely yellow, black, or collapsed.
Can Black Edges Turn Green Again?
No. Blackened leaf tissue is dead and will not recover. Focus on correcting care so new leaves grow in healthy.
Is Tap Water Causing My Peace Lily Leaf Edges to Turn Black?
It can. Peace lilies can react to mineral-heavy, softened, chlorinated, or fluoridated water, especially over time. Water quality is a common hidden cause when basic care seems correct.
Do Peace Lilies Get Black Edges From Too Much Sun?
Yes. Direct sun, especially hot afternoon sun through a window, can scorch the leaf margins and surfaces. Peace lilies prefer bright, indirect light.
How Often Should I Water a Peace Lily with Black Leaf Edges?
Water based on soil dryness, not a set schedule. A good rule is to water when the top inch of the mix feels dry, then let excess drain away completely.
Can Overwatering and Underwatering Both Cause Black Edges?
Yes. Underwatering usually causes dry, crispy edge burn, while overwatering more often causes softer darkening with yellowing and signs of root stress.
Will Misting Fix Black Edges on a Peace Lily?
Not by itself. Occasional misting gives only brief humidity relief. Better long-term options include steadier watering, improved placement, and higher room humidity.
Still not sure whether your peace lily has watering stress, root rot, or fertilizer burn? Read our houseplant troubleshooting guide or compare the best indoor plant soils and moisture meters to fix problems faster.